 Debugging an Audio Unit is not as straightforward as debugging a Cocoa application, because your freshly coded component doesn’t show up until you insert it in a bus of your favorite DAW.
In this article, we review some methods for automating your debugging sessions using XCode 4. Concerning the DAW, our preference goes for a free host available in the CoreAudio SDK: AU Lab. In only a few steps, you will be able to setup some breakpoints and look into all potential devilish bugs as if you were debugging a simple Cocoa application.
Prerequisites
We assume that you’ve downloaded the sources of this tutorial on GitHub, and that you have successfully built your component with the default debug configuration.
Manage schemes
Xcode 4 provides a classic workflow for testing and packaging your component:
Build your component
Run it using debug configuration
Test it using debug configuration
Profile it using release configuration
Analyze your code for possible tweaks
Archive a delivery for distributing
This basically suits our needs. The only thing we have to do is launching “AU Lab” on step 2:
Click on your target “SpectrumAU” in the top left area of XCode
Choose “Edit scheme…”
Select step “Run - Debug”
In the “Executable” field, choose “Other…” and browse you Mac in order to find “/Developer/Applications/Audio/AU Lab”
Save scheme

Now, AU Lab will automatically launch each time you hit “Run”.
Still, your Audio Unit doesn’t show up, because we haven’t copied the file SimpleSpectrumAU.component into your audio plugins folder. Since we don’t want to do it each time we compile a new version, we ought to tweak a bit our build settings to automate this.
Tweaking build settings
There are a couple of build settings that may help us automating each deployment.
To understand how they work, let’s make a few changes as a first try:
deployment > Deployment Location: choose “Yes”
deployment > Deployment Postprocessing: choose “Yes”
deployment > Installation Build Products Location: type “/”
deployment > Installation Directory: write “$(USER_LIBRARY_DIR)/Audio/Plug-Ins/Components/”
As a result, your audio unit is copied into your audio plugins folder each time you build! So, in one-pass, we successively build our audio unit, deploy it to the proper folder then run AU Lab to start a debugging session.
But I still get an annoying issue on my side (perhaps you won’t get it) : breakpoints don’t break. I suspect Xcode not doing the things we want. When I look into the “Debug” folder, the compiled component has turned into an alias, pointing to a binary now located in $(USER_LIBRARY_DIR)/Audio/Plug-Ins/Components/.

Actually, I don’t think the build settings we mentioned above are a viable solution for the “debug” configuration. However, we could keep them for the next stages of our workflow, so I suggest changing the build setting in that way:
deployment > Deployment Location:
choose “No” for debug
choose “Yes” for release
deployment > Deployment Postprocessing:
choose “No” for debug
choose “Yes” for release
deployment > Installation Build Products Location:
write “/tmp/$(PROJECT_NAME).dst” for debug
write “/” for release
deployment > Installation Directory: write “$(USER_LIBRARY_DIR)/Audio/Plug-Ins/Components/”
There is another trick we could try in order to automate our deployment in debug mode:
Open the “Build phases”
Add a “Copy files” phase as the last build phase
Specify an “absolute path” as destination: $(USER_LIBRARY_DIR)/Audio/Plug-Ins/Components/
Add the file “SimpleSpectrumAnalyzer.component” to the list
Now everything should be okay and our breakpoints will correctly break. The only drawback of this method is that you’ll have to cancel this build phase before you move into the next stages of you workflow. You must delete when I build your “release” configuration, else XCode will alert you of a possible loop when executing your deployment workflow.
Still… no sound ?
First off, don’t forget to start the AU Lab engine if you want your Audio Unit to process any sample. You can do this by clicking on the label “Audio engine stopped” on the lowest part of AU Lab’s mixer.
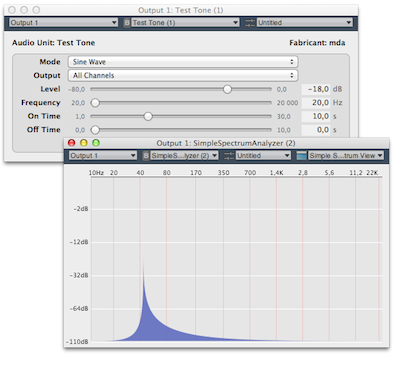
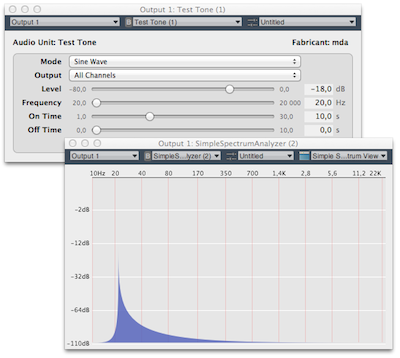
 Next, I recommend downloading the MDA AU plug-ins from Smartelectronix’s website in order to test our Spectrum Analyzer with a simple sinusoid as input signal. After you have installed it, you should be able to use the “TestTone” plug-in and generate a pure sine signal to test our spectrum analyzer:

By the way, we shall notice how inaccurate is our analyzer when testing a low-frequency sine-wave with 1024 samples as FFT Size. We can correct that by raising our FFT size : right-click on the graph and choose “2048” as block size.

And I’m still looking for a way to modulate the phase of this sine wave, in order to test “frequency leakage” and measure efficiency of our different window functions. You you have a trick for this with MDA AU or any other plug-in, please don’t hesitate to leave me a comment !
