
 In this part of the tutorial, we are going to design a Cocoa UI in order to draw the spectrum graph computed by our unit, in which we’ll create widgets so as to configure the FFT analysis.
Why using Cocoa? Well, for two reasons: I didn’t want to introduce a too complex API in this tutorial (such as OpenGL), and I would like to show you how to mix C++ and Objective-C in the same XCode project. Don’t worry, it doesn’t bother if you’re not experienced with Objective-C: we’ll make a straightforward use of it and we’ll clearly explain all the interactions between our GUI classes and our C++ code.
One build target more
First off, we ought to organize a bit our XCode project before we start coding our Cocoa UI. I may suggest you to create a new folder into “Sources” that will contain all your Objective-C code. Let’s call it “SpectrumCocoaView”.
We need to add a new build target to our project:
Choose the template “Mac OS X > Framework & Library > Bundle” and call you target “SpectrumCocoaView”. Please note that we don’t use the “Automatic Reference Counting” feature in this tutorial, so you may uncheck it. And yes, this time, you must link your target to the Cocoa framework.
Edit your new target’s build settings and add this to the “Other Linker flags”: -framework Foundation -framework AppKit
There’s not much to say about build phases: we classically include the required headers, then our Objective-C sources, however we just must not forget to add a XIB file which describes our GUI. I’ll explain this very soon.
You have to make a “build relationship” between you two targets :
Open the build phases for your C++ target called “SimpleSpectrumAnalyzer”.
Add a build phase of type “Target dependencies” positioned as your first operation.
Then add the product “SpectrumCocoaView” as a dependency.
Perhaps you don’t want to put your hands into problems for now, so you may prefer grabbing our existing XCode project before you continue your reading.
Design your interface
That’s where you create a new XIB file (preferably in your “Resources” folder) in order to design your GUI. At this step, we just draw our GUI components, and keep all the logic inside Objective-C classes we’ll create afterwards. It’s a good occasion to separate concerns between components: our Spectrum Analyzer GUI will divide the work between two main classes.
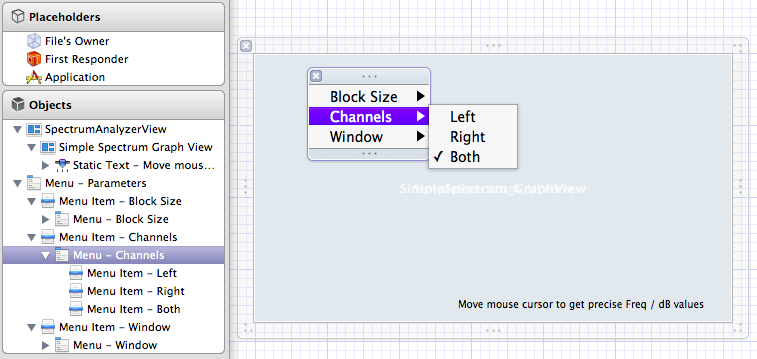
Here are the components we need to add to this document:
The root view, called “SpectrumAnalyzerView”: a Custom View responsible for all exchanges between the Audio Unit and the GUI, like sending/receiving parameters, or receiving new audio data to draw.
The subview, called “SimpleSpectrumGraphView”: a Custom View responsible for drawing the GUI using basic Cocoa objects such as Bezier curve, text labels, etc.
We add a child element to the subview: a TextField widget, that we’ll use to give more precise informations about frequencies and magnitudes.
Finally, We create a NSMenu widget in order to let users modify the Audio Unit parameters. It will pops up when you right-click anywhere in the SpectrumAnalyzerView.
Create GUI classes
For each custom view that we have added above, we need to create a class owning the programming logic. Objective-C is quite similar than C++: you first define your classes into header files, then implement them in source files. There are two things you should know before creating them:
Objective-C can contain either C or C++ code. It depends of the file’s extension you choose when you create your implementation : .m stands for C, .mm for C++. To keep this tutorial simple, and because we’ll include C++ headers in our Objective-C classes, I strongly suggest renaming all your .m extensions to .mm extensions.
There is no namespace in Objective-C, so Apple recommends to name all you classes using very specific names.
Before you go, don’t forget to choose the “SpectrumCocoaView” target each time you create a new Objective-C class. So we create these ones:
SimpleSpectrum_GraphView
SimpleSpectrum_UIView
and a very important one, SimpleSpectrum_ViewFactory
What is it for? This latter class is responsible for binding your GUI with you Audio Unit, hence it must implement the AUCocoaUIBase protocol. What is a protocol? It’s more or less like an interface in Java: by adding it to your class, you agree to implement all the methods defined inside. So in our case, it’s necessary to implement this method:
1 2 3 4 5 6 7 8 9 10 11 12 13 | |
Bind UI widgets to IBActions
This is the fun part of the Cocoa Framework. All you have to do is:
in your Objective-C code:
declare all your subviews and widgets as member variables of you custom class, using pointers to their base class
put the magic qualifier IBOutlet on each variable
create “action methods” that return the IBAction type and take an unique parameter of type id
in the XIB document:
select each view (or widget) for which you have developed a custom class
define this custom class in the “Class” attribute (on the right pane of Xcode)
bind Outlets together, that is to say, bind views with their subview and their widgets
bind Received Actions with the methods you’ve previously created

So far, we have designed a basic Cocoa UI and we have bound the most important widgets to actions developed in Objective-C classes. We have had an overall sight of how our Spectrum Analyzer basically interacts with the Cocoa UI.
We’ll soon study how to draw a beautiful spectrum analyzer, but in the meantime, we need to talk about the data we need to manage on both sides in order to transmit the FFT analysis to the UI.
Create Audio Unit’s parameters and properties
Your GUI will communicate with your Audio Unit using two types of data:
parameters: they hold user settings. They are called by the Audio Unit during audio processing and they are called by the GUI classes when the user modify them through UI widgets,
properties: they hold any kind of data exchanged between the Audio Unit, the Host and the GUI. They can be defined in the CoreAudio SDK, as well in your code as “custom properties”.
For our Spectrum analyzer, we define these three parameters:
kSpectrumParam_BlockSize: the FFT block size, from 1024 to 16384 samples. By raising this parameters, we raise the FFT precision, but in the other hand we get slower computing/drawing times,
kSpectrumParam_SelectChannel: a simple parameter to restrict FFT analysis on left or right channel (if our audio unit is inserted into a stereo bus),
kSpectrumParam_Window: the window function we choose to compute our samples before we do FFT analysis.
And we need those two custom properties:
kAudioUnitProperty_SpectrumGraphInfo: a simple structure that hold the infos our GUI needs to know before it can draw a spectrum graph,
kAudioUnitProperty_SpectrumGraphData: an array of floating-point numbers to pass the computed magnitudes to the GUI.
Building those parameters and properties on the Audio Unit side would require to add another endless part to this tutorial. Fortunately, there are many articles available on the net and I suggest reading the official Apple tutorial if you want to get more details in creating them in your C++ code .
Still, we must comment some lines of code from the C++ class “SimpleSpectrum”:
- Parameters must be declared as soon as your Audio Unit initializes:
1 2 3 4 5 6 7 | |
It’s best to declare all parameters and properties in a separate C++ header: SimpleSpectrumSharedData.h in our case. That way, we could use C++ for our Audio Unit and restrict our GUI code to pure Objective-C and C
Basically, to use a parameter defined both in the Audio Unit and the GUI, we have to call:
from the Audio Unit side: GetParameter(kSpectrumParam_BlockSize)
from the Cocoa UI side: AudioUnitGetParameter(mAU, kSpectrumParam_BlockSize, kAudioUnitScope_Global, 0, &inValue)
In this tutorial, we assume that the GUI has previously allocated sufficient memory before it requests any property content. Hence it’s also responsible for freeing this memory when it’s released. That’s why the code that transmit our custom properties looks like this, without allocating anything:
1 2 3 4 5 6 7 8 9 | |
- On the other side, in the class SimpleSpectrum_UIView class:
1 2 3 4 5 6 7 8 9 10 11 12 13 14 15 16 17 18 19 20 21 22 23 24 | |
The most of you, readers, will have noticed that we protect access to the computed magnitudes array with a mutex, provided by the class CAMutex (found in the “PublicUtility” folder). This is because the GUI code and the Audio Unit code both run in separate threads. The former may ask for the magnitudes while they are being computed, so we must synchronize this.
Edit 15/01/12: I committed a few changes on the lines above that brought some performance tweaks. It looks like the mutex isn’t that necessary, and I also removed some dynamic memory allocations to save some CPU cycles.
Synchronize Audio Unit’s data with UI
So… how can we draw the spectrum graph once magnitudes have been computed by our SimpleSpectrumProcessor class? We have two options:
We could add a NSTimer in the class SimpleSpectrum_UIView that cyclically “asks” for the computed magnitudes.
We could “notify” the class SimpleSpectrum_UIView each time new magnitudes have been computed.
I tried both solutions, and I prefer the second one. To achieve this, you need to create a callback listener in the class SimpleSpectrum_UIView, and follow these guidelines:
create the method dispatchAudioUnitEventProc with a special signature and register it as a callback method (SimpleSpectrum_UIView.mm, line 188)
register an AudioUnitEvent for every parameter/property you’ve created (SimpleSpectrum_UIView.mm, lines 194-215)
catch a “property changed” event for our custom properties kAudioUnitProperty_SpectrumGraphData and kAudioUnitProperty_SpectrumGraphInfo(SimpleSpectrum_UIView.mm, lines 144-149)
send this “property changed” event in the audio unit main code (SimpleSpectrum.cpp, line 89)
write a method that will pass properties to the UI (SimpleSpectrum.cpp, lines 95-150)
write a method that will draw magnitudes, or at least delegate this draw to the class SimpleSpectrum_GraphView (SimpleSpectrum_UIView.mm, lines 224-251)
Okay, I admit that there is a lot of steps. There are many lines of code involved in this synchronization, written with different semantics, three programming languages, etc. Things could be easier, that’s we’ll perhaps discover when we’ll write our first VST in an upcoming tutorial ;)
Though, our spectrum is still not moving. We need to talk about the class SimpleSpectrum_GraphView and its drawing techniques.
Bringing the spectrum alive
There are three things I would like to write about in this class.
First of all, the object NSBezierPath is my easy method for drawing the spectrum. All I have to do is moving to a certain NSPoint, then draw lines/curves using the methods lineToPoint and curveToPoint (or may I write “messages”? Since we are writing Objective-C…). There is a good tutorial on this in the Apple documentation.

Secondly, I use the object NSAffineTransform each time I need to change my coordinate system. This is important to understand that we have to draw several different things:
the grid, from left-to-right and top-to-bottom
the frequencies/decibels labels, by transforming twice the coordinate system
the spectrum curve from left-to-right
So either you get an headache with maths, either you feel sick using NSAffineTransform. I personally got an headache and felt sick, but the use of NSAffineTransform has structured my code. You should look at this tutorial for further explanations.
At last, you might notice a few additional things:
that we have used a bunch of methods so as to draw frequencies/decibels in a logarithmic scale (SimpleSpectrum_GraphView.mm, lines 87-145)
that we have added some mouse callbacks in order to display the precise frequency/decibel under the mouse cursor (SimpleSpectrum_GraphView.mm, lines 334-374)
We now have everything we need to build a clean Cocoa UI, and at this time, I hope that you have everything set up in your XCode environment and that you can hit “Build” to get your first debug release.