
 It’s time to build up our first audio unit.
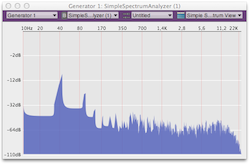
For a start, I propose to create a spectrum analyzer which will help us to understand how we can realize basic sound analysis using the Fourier Transform. While this might sound scarily complex for non mathematician developers, you will smoothly read this tutorial if we first explain a few concepts about sound processing, without of course entering too deeply into the maths…
About the Fourier transform
Well, in fact, we shall talk a bit about maths.
As you might not know, the Fourier transform is a powerful mathematical tool that can translate an audio signal, represented by a function x(t) in the time domain, into another function X(α) in the frequency domain (α having its unit in radiant). This is exactly what we need in order to analyze every frequency that compose the audio signal coming through each input of our Audio Unit.
To understand how this computation works, I may suggest you reading this great tutorial from Stephan Bernsee. He explains how Joseph Fourier, back in the nineteenth century, found out that a periodic signal could be decomposed into a sum of simpler periodic functions which are our well known functions sinus and cosinus .
I personally had no difficulty to read Stephan’s tutorial, yet I couldn’t figure out what was the relationship between sinuses and cosinuses once we were in the frequency domain. The answer, unfortunately, is tied to a dull mathematical concept : complex numbers. That is, if our audio signal can be represented with a bunch of real numbers, the resulting function X(α) uses complex numbers to represent frequencies that compose our signal, simply because the Fourier transform uses the exponential function (also known as the Euler formula), which translates real numbers from the Real domain (as input) to complex numbers into the Complex plane (as output).
Well, it is almost time for me to close this book and go to bed, except perhaps if you tell me a “concrete” method for visualizing F(α). That’s where we use our Wikipedia card to steal a graphical representation of the Euler formula :

Look at this unit circle drawn in the complex plane carefully, and I promise that an explanation will shade out in a couple of seconds.
Just imagine that the Fourier transform F(α) draws some plots inside the above circle, thus you can draw those evil complex numbers on the complex plane with each coordinate being x = Real part = cos α and y = Imaginary part = sin α. Put your finger at the rightmost plot on this circle, where α = 0, then start moving on the circle in the counterclockwise direction. For every α frequency between 0 and 2π, you can determine at least two properties, the phase and magnitude, by using simple trigonometry with the corresponding complex number on F(α).
Since our concern for building our spectrum analyzer is to only get the magnitude, I’ll ignore phase for this tutorial. To compute the magnitude, you just may remember the famous Pythagorean theorem which says… well, do you remember ?

That is, (magnitude(α))² = Real part² + Imaginary part² = (cos α)² + (sin α)², hence magnitude(α) = SQRT(Real part² + Imaginary part²) = SQRT((cos α)² + (sin α)²). We have almost everything we need, though some last details will be be discussed at a later stage of this tutorial.
So far, to wrap things up, we need to :
compute the Fourier transform F(α) of our audio signal f(t)
for each frequency α, compute it’s magnitude
then, draw a beautiful spectrum analysis
Fortunately, we do not have to compute the Fourier Transform by hand (that’s why I’m not giving you the formula). A lot of optimized algorithms are available, and among those, there is the "Fast Fourier Transform“ (FFT), which is able to compute the Fourier transform very quickly, given a windowed audio signal of N samples, N being a power of two.
The last statement isn’t exactly true : in fact, the FFT is an algorithm for the “Discrete-Time Fourier Transform” (DTFT), which is a specific FT applied to a discrete time function x(n) representing our sampled audio signal received by our Audio Unit. There aren’t many differences, apart the fact that since we provide to the FFT a window of N samples, the DTFT is an approximation of the FT that necessarily introduce precision loss in our spectrum analysis. This is called the “uncertainty principle”.
By the way, I think we cool look at the DTFT formula to learn a few things about the FFT :

What I can read here is that we’ll pass N samples (N being a power of 2, as said above) to the FFT transform, in order to get at most N complex numbers describing frequencies on the complex plane (we’ll choose the value for N later in the tutorial). So, as a developer, you will have to extract those N samples, store them in a buffer, and prepare an array of dimension to 2N to receive the resulting complex numbers.
Those resulting complex numbers can be split into two equal parts : the complex part and its conjugate. Since all the conjugates aren’t necessary for our audio analysis, you will see that we’ll be using a library that truncates them and store in fact N/2 complex numbers in a buffer equal to an array of dimension N. We use to call those N/2 complex number our “bins” (like in Bernsee’s tutorial), and these “bins” gives us magnitude for N/2 frequencies. Thus, it’s important to choose a relevant size for N so as to not introduce too much precision loss in our spectrum analysis.
Are we done? Nope, there is one last pitfall that our spectrum analysis must handle : frequency leakage.
Frequency leakage
I suggest reading this tutorial to understand frequency leakage. What can we say about it ? Well, we cannot completely eliminate this phenomenon, but we can limit it by applying a window function to our N samples before we pass them to the FFT.
There are several window function available, but I’ll choose only three to include to this tutorial, so as to illustrate frequency leakage : Hann, Hamming and Blackman.
So finally, here are the steps that we need develop in our Audio Unit :
extract N samples of our audio signal
apply a window function to our N samples
compute the FFT
for each “bin” that correspond to an approximation of a frequency, compute it’s magnitude
at last, draw an almost perfect FFT analysis
For the good news, I announce that my mathematical thoughts are (almost) over, and that we may now introduce the killer library that will help us achieve those beautiful things.
When comes the Accelerate framework
The Accelerate framework is part of Mac OS X since version 10, and honestly it’s a gift given to developers that would like to do computational programs in an efficient way. Part of it, the vecLib library provides the FFT transform and many other mathematical functions, whose fast algorithms use vector processing units of x86 (and formerly PowerPC) processors. That is to say, vecLib use SIMD units (“single instruction multiple data”) of your processor(s), like Intel x86 SSE extensions, to accelerate FTT computing.
Because we’ll be using vecLib in our tutorial, there are two concerns we have to keep in mind :
we need to design our buffers used for FFT computation so that their memory is aligned on a 16-bits boundary,
we may preferably allocate our buffers memory in contiguous spaces, thus avoiding paging operations between two SIMD instructions (that would cut down performances and cancel benefit provided by the SIMD units).
Don’t worry, we won’t implement any hard programmatic scheme to solve this : we’ll just revisit those two requirements when we’ll be designing our simple class called SimpleSpectrumProcessor that handled all the FFT processing in part II of this tutorial.
Which GUI ?
This is not the most efficient choice for Audio Units, but for studying purpose, we’ll design our UI using Cocoa and Objective-C. That way, we’ll see in part III of the tutorial how to mix two different languages in the same XCode project.
The Setup
We’ll start with the XCode template we had previously created in my first article. While our main sources will be written in C++, we’ll create a second folder to store our Objective-C code, and also add an additional target to build the Cocoa UI.
There are a few last steps you may require before you can move to the next part of the tutorial. I leave them as an exercise for the reader :
Create a new XCode projet called “SimpleSpectrumAnalyzer” that can build an Audio Effect for OS X Lion
Add the “vecLib.framework” and the “Cocoa.framework” to your project
Create two deployment targets:
one to build the Audio Unit file “SimpleSpectrumAnalyzer.component”,
another one to build the second bundle called “SpectrumCocaView.bundle”, which will contain the CocoaUI
Find a way, by tweaking the build phases, to include the second bundle as a resource into the first bundle
Once done, we are ready to gather all the concepts seen in this article in a simple C++ class, SimpleSpectrumProcessor.