
 Apple usually takes care of their developers community. Whereas they lately delivered an impressive update of their Xcode IDE with tons of new features (read a cool review here), they surprisingly removed the project template for creating Audio Units. Nevertheless, let’s see how to create a new unit from scratch…
Of course, the Core Audio SDK is still located in /Developer/Extras/CoreAudio and it’s still possible to develop Audio Units with XCode 4.2. So you have two solutions :
either you grab a sample code from Apple documentation (like “FilterDemo” for instance) and migrate it to suit the latest changes done in OS X Lion for the Core Audio SDK (there is an official technical note to read here),
or you can learn, by following this tutorial, how to build you audio unit template from scratch in only a few steps !
EDIT for XCode 4.3.2 users: You may have noticed that starting from version 4.3.2, XCode is now a bundled app installed in /Applications. There is no more /Developer folder and since you are likely to use the CoreAudio API, you absolutely need to dowload the optional package named “Audio Tools for XCode” from the Apple website. Please click on XCode > Open Developer Tool > More Developer Tools… to reach the dowload page. And of course, you’ll have to rewrite by yourself some links provided in this tutorial.
Create the project
You need to create a new project using the template “Mac OS X > Framework & Library >Bundle”.
Indeed, an Audio Unit is basically a bundle with a different file name extension “.component”. When asked, select “Cocoa” as framework, even if none of the proposed choices suit our needs for now. We’ll clean those unwanted libraries later.
Organize your files
Your project must contain at least :
one group for storing all C++ sources files, including your created classes and some sources coming from the CoreAudio SDK you will necessarily use,
one group for storing your resources, including a “property list” manifest that describes your audio unit,
possibly one additional folder for C++ - or Objective-C sources - to create a GUI for your unit. However, for sake of simplicity, we’ll discuss this in another tutorial. Leave it for now.
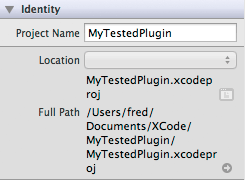
By the way, don’t neglect the “Identity” pane displayed when you open the rightmost view. You’ll find two fields, “Location” and “Full Path” that can help you cleaning the mess if you want to add / delete a lot of files, or create new groups that “map” to existing folders in your project directory.
Tune your deployment target
Click on the project’s name to display the available deployment targets.
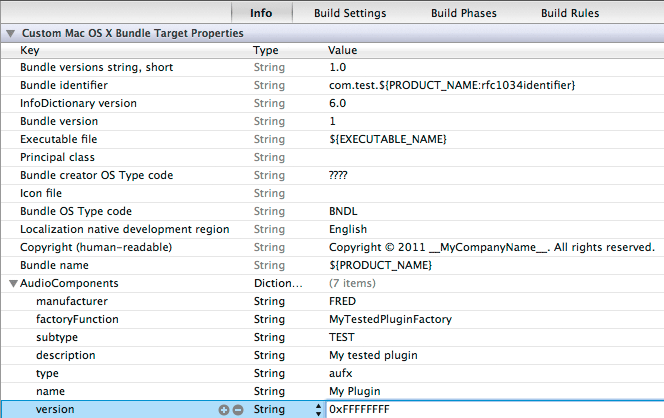
You can reuse the default target created by Xcode. The first tab “Info” shows the content of the property list file located in your resources folder (if not, check the path entered in the tab “build settings”, under the key “Info.plist File”). There is only one piece of information missing here : you must add a new Dictionary called “AudioComponent” containing at least 7 strings :
manufacturer: your name
factoryFunction: the classname of your factory, for this tutorial type “MyTestedPluginFactory”
subtype: a 4-alphanumeric code categorizing your unit, for instance “TEST”
description: a brief description
type: a 4-alphanumeric code defining your unit type. Please consult SDK documentation to get all the available types : for this tutorial, we are creating an audio effect, so type “aufx”
name: your plugin’s name
version: an hexadecimal number defining the version number of the unit. The magic here wants you to enter OxMMMMmmHH, where MMMM is major version, mm is minor version and HH is hotfix number. But if, like me, you want to test your updated plugin every time you compile a new version, just enter “0xFFFFFFFF”.
Next, move ahead to the tab “Build settings”. Toggle the filter from “Basic” to “All” and proceed to a few changes on values :
Architectures: I suggest creating a standard 32/64-bit Intel binary
Build active architecture only: choose “no”
Compiler for C/C++/Objective-C: this is not mandatory, but if you wish to use the new compiler LLVM 3.0, help yourself
Linking > Other linker flags: ensure “-bundle” is specified
Wrapper extension: change this extension and write “component”
Rez Search path: You need two values here
/Developer/Extras/CoreAudio/AudioUnits/AUPublic/AUBase
/System/Library/Frameworks/CoreServices.framework/Frameworks/CarbonCore.framework/Versions/A/Headers
Precompile prefix header: choose “yes”. I suggest using the one provided by the Xcode template.
There will be one more key to adjust, but we can’t see it until we have modified the “Build phases” first. So let’s move to this third tab.
Refactor the build phases
Honestly, I find the XCode build system absolutely wonderful. Everything you need is to add a few build phases then XCode will compile and link your binary without asking too much questions.
Here are the build phases to add for our Audio Unit:
Copy Bundle Resources: this may already exist. You will necessarily include in this phase the Info.PList we tweaked earlier.
Copy Headers: necessary to compile you C++ header files. We’ll add files to this phase later.
Compile Sources: necessary to compile you C++ source code. Again, we’ll add files to this phase later.
Link Binary with libraries: do your shopping but add at least three libraries : “CoreServices.framework”, “AudioToolbox.framework” and “AudioUnit.framework”. Remove everything else (even “Cocoa”).
Build Carbon Resources: it looks like you won’t see this build phase until you create a file named “MyTestedPlugin.r” in your project (preferably in your “Sources” group). Create it, then go back to your build phases, then you will be able to add this phase and include the file above.
There are a few additional build phases we could discuss, but I reserve them for an upcoming tutorial.
Wait… you still need to go back to the “Build settings” tab and change the remaining key “Other Rez Flag”, by entering this:
-d i386_$i386 -I /System/Library/Frameworks/CoreServices.framework/Frameworks/CarbonCore.framework/Versions/A/Headers -I /Developer/Extras/CoreAudio/AudioUnits/AUPublic/AUBase
Here we are.
Fine-tune your precompiled header
Here is the minimal precompiled header you would write for your Audio Unit :
1 2 3 4 5 6 7 8 9 10 | |
Add CoreAudio files to your project
Right-click on your “Sources” group and choose “Add files to MyTestedPlugin…”.
Move to /Developer/Extras/CoreAudio.
I’ll give you a precious advice here: before you click on “Add”, ensure that “Add to Targets: MyTestedPlugin” and “Create groups for any added folders” are selected.
You will find below the list of the folders/files you absolutely need to add to your project :
AudioUnits/AUPublic/AUBase
AudioUnits/AUPublic/OtherBases/AUEffectBase.*
AudioUnits/AUPublic/Utility
PublicUtility/CAVectorUnit.*
PublicUtility/CAAudioChannelLayout.*
PublicUtility/CAHostTimeBase.*
PublicUtility/CAStreamBasicDescription.*
PublicUtility/CADebugMacros.*
PublicUtility/CAException.*
PublicUtility/CAXException.*
PublicUtility/CAAutoDisposer.h
PublicUtility/CAMath.h
PublicUtility/CAThreadSafeList.*
Normally, all the .h and .cpp files have been added automatically to the “Copy headers” and “Compile sources” build phases. If not, you’ll have to add them manually by editing your build phases.
It’s time to code !
You may create at least one header file and one cpp file for your custom classes. For the purpose of our tutorial, here are the minimalistic classes you need to copy'n'paste:
1 2 3 4 5 6 7 8 9 10 11 12 13 14 15 16 17 18 19 20 21 22 23 24 25 26 27 28 29 30 31 32 33 34 35 36 | |
You ought to not omit the macro AUDIOCOMPONENT_ENTRY, since it’s responsible for creating the stub classes MyTestedPluginEntry and MytestedPluginFactory as entry points for your Audio Unit.
Populate Carbon resource file
Remember the file “MyTestedPlugin.r” you created earlier ? It’s time to fill it with standard content :
1 2 3 4 5 6 7 8 9 10 11 12 | |
This step remains to keep backward compatibility with previous versions of CoreAudio SDK. You may copy and past the information you wrote in the Info.PList.
I suggest to try compiling your project after you have finished this step. If you get any “Rez error”, you should check that in your build phase “Build Carbon Resources”, the file above is the only file added to the task.
Export Symbols
There is one last important step you need to do : you must configure the linker to indicate that two symbols, “MyTestedPluginFactory” and “MyTestedPluginEntry” , are available for use in your component.
Create a file MyTestedPluginEntry.exp that contains :
_MyTestedPluginFactory
_MyTestedPluginEntry
Then go to your project build settings and give the path to this file into the key “Exported Symbols File”.
Compile, test and go!
You should be able to compile you Audio Unit now, but before we go we have to test using auval :
First, copy your compiled component into ~/Library/Audio/Plug-Ins/Components
Secondly, open Terminal and type :
auval -v aufx TEST FRED
In case you’ve made a 64 bits plugin, you should rather type :
auval -64 -v aufx TEST FRED
Auval is processing a bunch of tests to validate your Audio Unit. Since it currently does nothing, you should get the PASS mention and see it in you favourite sequencer as an audio effect.
Conclusion
I agree that this tutorial isn’t the funniest you’ve ever read, but it was necessary to setup our template to move on more interesting things in our next tutorials. We’ll soon see how we can make some fun out of this Xcode template.